Free 2nd Day Shipping on orders above $50.
Free 2nd Day Shipping on orders above $50.
When your printer suddenly stops printing or refuses to print, there are several reasons behind it. Ink levels might be getting low, or there could be paper jammed inside, preventing your printer from working. Or it could be because of a detached cable or a driver/software that requires immediate updating.
It’s also possible that some parts of your printer may have malfunctioned or are damaged. To find out if it’s still operational, you can conduct a printer test page. You can do this using your computer’s Operating System, like Mac or Windows, or through the printer control panel. If the test is successful, this means that your printer is fully functional.

There are numerous effective ways to measure and gauge a printer’s performance, and a test page is one of them. A printer test page likewise examines whether your printer and computer are in proper sync with each other.
The particular test can diagnose several aspects of your printer and fix errors as well as resolve ink cartridge problems. It can also serve as part of an overall maintenance system that you can regularly use for your printer.
Doing a printer test page will uncover and pinpoint possible causes as to why the device stopped printing. It can identify a clogged printhead and alignment problem and help match color replication as well. By identifying an issue through this test, you can resolve the problem faster, preventing it from becoming worse.
Conducting a test page on your printer also helps its ink flow properly. Once your printer becomes idle for an extended period, the printhead may get clogged. The ink inside the cartridges and carriage may also dry out and trigger obstructions or uneven ink flow.
You can help maintain your printer’s overall condition and performance with a regular test print. It also lowers printing costs and offers better value in the long run with a more efficient working printer.
When you run a test, the page will show all potential problems with its print. They include streaky and blurry prints, as well as missing colors or no prints whatsoever. Some ink brands, like Epson, Canon, and HP Printer Ink, are resistant to fading, smudging, and bleeding.
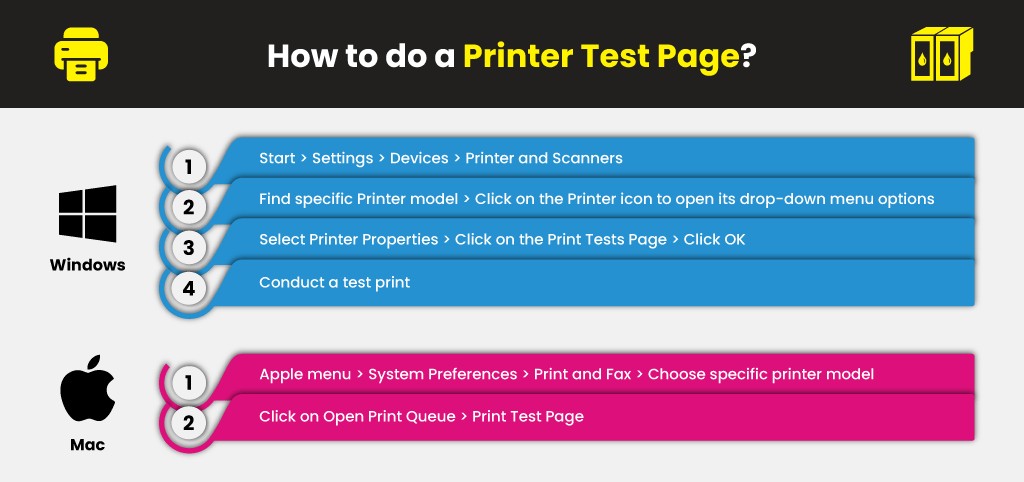
After identifying the problem through the test print, you can quickly determine the proper troubleshooting method to fix it. Before anything else, however, let’s discuss how to test printer performance through Windows and Mac OS.

Before you conduct the test print, know that you can adjust the print color by modifying its settings. You can do a printer test page black or in color and even calibrate how thick your prints will be. Don’t forget to select the correct paper size and use it on all papers for the test print. If the test uncovers a specific issue, fix it accordingly.
Overall, the printer test page can work with:
The test print can work with all printers, regardless if you’re using an HP, Brother, Epson Ink, or any other brand. You can create test pages and find out if it’s time for new and more discount printer ink cartridge replacements.
You can do a test page from your printer regardless if it’s a laser, inkjet, LED, or non-impact design. It’s also possible to conduct a black printer test page or any other ink color for any type or model.
You learned how to print a test page from your printer using Windows and Mac Operating systems. But you can also do it with Linux to check ink levels and identify potential issues in your printer.
A printer test page contains toner or ink levels as well. In case it shows low levels, you can choose to change them or use them down to the last drop. Keep in mind that conducting a test print may also differ for every Windows version. The method I shared with your above is for Epson printers and Windows 10. In the end, though, the process is virtually the same for each printer and Windows OS.
With a printer that has an LCD control panel, you can do the test print there. Keep in mind the necessary steps, like connecting your printer to a computer, either through a wired or wireless connection.